Spring has officially began! That means it is time for beautiful sunshine, pollen and spring cleaning! I’ve rounded up ten helpful spring cleaning tips and resources to help you get your house in tip top shape.

…
Delicious Recipes to Keep my Family of Four Happy and Full
Spring has officially began! That means it is time for beautiful sunshine, pollen and spring cleaning! I’ve rounded up ten helpful spring cleaning tips and resources to help you get your house in tip top shape.

…
This weekend was an especially great one for several reasons.
1) It was a 3 day weekend for me! Yep, I am back to taking alternating Fridays off and it was pure bliss to have an extra day off.
2) My parents were visiting for the weekend. I don’t get to see them as often as I want because they live too far away. Hopefully, one day that will change.
3) We got to go out on Saturday night!
Friday
We did errands most of the day. We visited a potential new preschool for H and then hit up the regular places: Target, Costco, Babies R Us.
By the time we were all done with that, my parents were in town and it was time to pick up Baby E. His daycare was closing early that day so we scooped him up and took him home for some grammy time.
I also convinced Mathlete that it was high time we hung some of the random stuff sitting around our house waiting for nails and hammers to help them out.
I’m sure remember my bunny picture. It’s finally taken its rightful place in the playroom to watch over the kids while they play.
Also in the playroom, we created a new home for all of H’s princess and barbie dolls (yes, it is a canvas over the door shoe rack that we re-purposed).
From there, we hit the upstairs spaces like the guest room and H’s room.
You should go ahead and picture a second frame next to that one along the wall. We’re using them to display H’s artwork that she creates. Yep, my budding picasso painted the artwork you see in that frame. Not too shabby for almost 4 years old!
Once all of the manual labor was done, we settled in for some dinner and playing outside with the kids. The men headed out for a boys night after all the kiddos were in bed. Some of the attendees (ahem, Rock Boy) would suffer from their partying the next morning.
Saturday
Farmer’s market day! H was so excited to take my parents to the farmer’s market. I’ll apologize in advance for the lack of pictures but mom was the designated photographer for the day and I forgot to swipe her camera for a picture download before she left! Trust me though, it was fun!
From there, we introduced H to the wonders of Mongolian BBQ where she was very excited to watch them cook the food but then ate a quesadilla.
Not only were my parents in town for a visit, they were also there to help us out in a major way. We had tickets to go see Casablanca at Wolf Trap and they were going to watch our kiddos. Not only that, they were going to be the ultimate grandparents and watch the 2 kids next door too! Did I mention I was pretty lucky?
So, while the grandparents coralled the kids, we headed out in the beast to Wolf Trap. They were playing the movie with all of the music removed and the National Symphony Orchestra playing the music instead. It was so seamless that, if they hadn’t told us from the beginning, we would not have noticed at all!
Welcome to Wolf Trap (or for some Wasssup Wolf Trap)!
Sshhhh…the movie is starting!
Sunday
Many of us struggled to get up after the fun times the night before. After pulling it together, we headed to our Sunday morning meeting spot: the pool! Then, Rock Boy shared a groupon with us so we could all pig out on Pho (H’s fave).
After lunch came something harder than I expected…saying goodbye to my girl for a whole week! She is spending the week with my parents. She was so excited and I was fighting back tears. I know she is going to have a blast though so I am excited for her.
Plus, she has her traveling companion so I know she’s good.
We quickly went from hugs and waves goodbye to the culmination of the meal swap! Can you say “yay distraction?” The five other ladies from the swap arrived so we could get down to business (more on that later). Oh, and one brought
After devouring one (or three) of those, I settled in to work on the project for my Pinterest Challenge project.
Hope everyone had a great weekend too! I can’t wait to read/hear about them.
© 2012 Just Us Four. ALL RIGHTS RESERVED.
I mentioned here that I was working on changing up a chest of drawers that I purchased on Craigslist. I had it primed and ready for paint.
Over the past week, I was able to get several coats of paint onto the frame and drawers.
Once I had 2 coats of paint on each piece, I added a coat of acrylic. I used Minwax Polycrylic in Semi-gloss.
I let it sitting in the garage for about 48 hours before taking it upstairs. It was pretty humid outside so I wanted to make sure the paint and acrylic really hardened before putting it in its home. Mathlete still insisted on keeping the cardboard underneath so we are doing it up super fancy in the guest room right now.
I had breifly thought about painting the hardware that came with the chest but then I saw the hardware you see in the pictures above on the clearance rack at Target. I just couldn’t resist.
Here is the before/after:
© 2012 Just Us Four. ALL RIGHTS RESERVED.
As I teased here, I’ve been working on painting. I’m not allowed to paint walls (yet!) because I haven’t demonstrated the painting prowess my perfectionist mathlete is searching for so I am starting small…with a chest of drawers.
I bought this baby on craigslist for $50. It’s solid wood and was once a changing table. The top actually folds down and out to magically transform into a changing table (definitely not sturdy enough my chunky monk but maybe a smaller kiddo). My first thing (after removing its drawers obviously) was to remove that folding shelf. I’m not using it a changing table and didn’t really feel I would use the folding shelf at all. Out came the screwdriver (and mathlete):
Once we removed all the screws, the shelf just popped right off the top and it was time to fill in the little holes left by the screws.
Meet Mr. Putty…hole filler extradonaire
You just press this stuff down into the holes and then scrape off the extra. I also wiped around the holes with a shop rag because I didn’t feel like the scraper got enough of the extra filler off of the non-hole parts.
With the holes all filled, it was time to start priming. I removed all of the hardware from the drawers and primed those first with my Kilz No-Voc primer. For the drawers, I did two coats with a regular sized foam brush (20 for $1 this week at Michaels!).
I had originally planned to sand everything but, when I was painting sample colors on it, I discovered that it didn’t really need sanding at all. It didn’t have a shiny finish or much of a sealant on it to start with. The primer went on very easily and smoothly. Once the drawers were done, I pulled out my foam roller and took it to the chest.
Those pictures are one coat of primer. It was getting late and my bed was definitely calling so I stopped my painting project there. It is about to get hot outside again though and I will want my garage back for my car so I expect to finish this whole painting thing up fast!
© 2012 Just Us Four. ALL RIGHTS RESERVED.
I’m big on organization. I despise clutter and feel at ease when everything is in its perfect place. Right now, you are probably thinking that having kids doesn’t mix with that type of mindset and you are 100% right. Actually, being married to Mathlete doesn’t exactly work with that whole “everything in its place” lifestyle either. I got over my need for “perfectly in its place” a long time ago but I still prefer to have the house pretty organized and clutter-less.
We have two major “clutter catchers”: the peninsula when you first come in the door from the garage and our (currently furniture-less) living room. The playroom stays a mess but that is an entirely different post!
When we first moved in, I went crazy buying a bunch of organizational “tools” from a type a personality’s dream store. Combined with the things I already owned, I was able to keep control of the mess for awhile. Then, baby E came along and all that went out of the window.
Today, Junior was headed to the Container Store for some organizational tools of her own. Hoping to get back to mecca a reasonable state of organization in our house, I had her pick me up a few things:
2) The other biggest, child related, source of clutter are dolls. We have the princesses, the fairies and some other random type of doll. I was cruising around the website and came across the idea to use shoe bag to store the dolls. Genius! When I have some more time, I’ll probably try to stencil it or otherwise personalize it.
Our living room doesn’t get stuff put in it daily but it is a clutter problem in a different sense because everything gets dumped there: bags of stuff purchased at the mall, shoes, extra furniture…you get the idea. It has gotten so bad that some of items from the living room are migrating to the dining room making the mess stretch much farther than I like.
Unfortunately, there isn’t anything at a store that can just magically make this stuff go to its rightful home. So, that something is going to have to be me! H is skeptical that we’ll be able to accomplish this task…
Do you have a clutter problem or do you find ways to keep your house clutter free? Are there any organization products you just can’t live without?
© 2012 Just Us Four. ALL RIGHTS RESERVED.
Sorry for the cheesy title there but I just can’t help but thinking of the “you light up my life” song when I start to write about my lighting debate. You can blame it on hours of pouring over lighting source websites and catalogs (poor me, right?!).
As you can tell from the title, we are looking to replace the light fixture over our breakfast table and coordinating pendant lights that reside over the island. You can see the all of them in this (not so great) picture:
You can see that they aren’t bad but I am not in love with them either. The pendant actually need to be raised because they are too low and bang into your head when you are trying to cook. The globes are really dirty with the frost peeling away too. Yuck. I figure if I am going to shop for new pendants that I might as well go ahead and find a new fixture for over the breakfast table too.
We’re replacing the breakfast table for something a little larger and have chosen this one for its great price. After all, we still have another kid to go through and, if the damage to our current table from Hailey’s younger days is any indication, that poor table is in for a beating!
On to the light contenders…
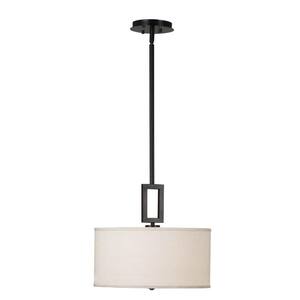
1) I’m a big fan of the simplicity of this one. It even has pendants that pretty much look like mini replicas of the big light available.
 |
| Home Depot |
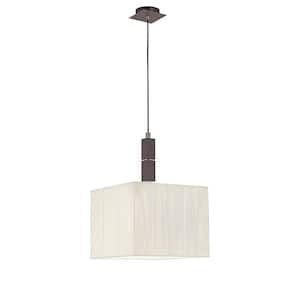
2) This one is similar but with a square shade instead of a round one.
 |
| Home Depot |
3) I love the idea of the exposed bulbs in both of these fixtures.
 |
| West Elm |
4) I also really like the shape of this one. I can see it over the island and paired with a bell shaped larger fixture for over the table.
 |
| Shades of Light |
5) Then, there is my all time favorite which I just can’t get my pocket book to agree to.
 |
| Acadian Lighting |
© 2012 Just Us Four. ALL RIGHTS RESERVED.
I mentioned here that I had finally gotten around to purchasing a frame for the bunny picture I purchased over a year ago for our playroom. The painting project took a little longer than planned because I ran into a few obstacles along the way.
I had this great natural wood frame I scored for $7.50 that I planned to put white paint on:
My plan was to pull the glass out of the frame to make it really easy to paint the frame itself. That’s when I met my first obstacle…I couldn’t get the glass out of the frame without potential damage to it. So, our came the painter’s tape. I tape around the edges and put on my first coat of primer.
As you can see, I needed a second coat of the primer. After the second coat of primer, I put on the white semi-gloss paint I had for the frame. It’s nothing fancy but does the trick. After I put the paint on (2 coats), I pulled the painters tape off and saw my second obstacle…the paint had bled a little under the tape.
The solution: I grabbed a razor blade and scraped off the extra paint from the glass. Then, we were ready for hanging (well, ready for hanging once the kids aren’t sleeping so we can actually bang on the walls!)
© 2012 Just Us Four. ALL RIGHTS RESERVED.
Ok, so maybe Mathlete has a small point. There is a lot more green text on there compared to the amount of strike throughs. Although to be fair (to myself), some of those items just became more detailed and aren’t really new compared to the old list. Oh, who am I kidding…I am constantly adding to this thing and it will probably never be completed!
© 2012 Just Us Four. ALL RIGHTS RESERVED.
He worked until 8pm or so on it and got to the point of attaching the swings. He stopped though because the whole thing needs to be staked down for security and he didn’t want to attach the swings prior to staking it down. Here is how it looked at the end of the night.
© 2012 Just Us Four. ALL RIGHTS RESERVED.
5.30.11
Seeing the railings in the back with fresh paint made me want to freshen up the other railings around the house. So, this weekend, my project was to finish painting the railings at our house. This time the focus was the front porch railings which weren’t quite as rusty as the back ones but still could use some fresh paint.
© 2012 Just Us Four. ALL RIGHTS RESERVED.